Concept artists
You need a quick blockout for a creature, prop, vehicle, or environment idea.
Use hitem3d to create a visual starting point, then adjust proportions and details in your preferred 3D editor.
hitem3d tutorial for beginnersPractical workflow
This guide explains how to use hitem3d for a repeatable 3D modeling workflow, from preparing an input to checking the delivered result. Start with a simple subject, then refine the request one change at a time.
Before you begin
A little preparation makes hitem3d more predictable. Choose one clear subject, decide what the model is for, and gather a useful reference if your idea is difficult to describe.
You need a quick blockout for a creature, prop, vehicle, or environment idea.
Use hitem3d to create a visual starting point, then adjust proportions and details in your preferred 3D editor.
hitem3d tutorial for beginnersYou want a rough asset to test scale, composition, or a gameplay scene before full production.
Keep the prompt focused on silhouette and major forms so the first hitem3d result is easy to evaluate.
hitem3d tutorial for beginnersYou have an object idea and want a visual model before deciding how to edit or print it.
State the intended shape clearly, inspect thin parts, and treat the generated hitem3d output as a draft that may need repair.
hitem3d tutorial for beginnersYou need early forms for a product, accessory, or presentation concept.
Describe materials and broad geometry first; use hitem3d for exploration before detailed manufacturing work.
hitem3d tutorial for beginnersThe core process
The hitem3d workflow is easiest to manage as a short loop: prepare, generate, inspect, and refine. Do not try to solve every detail in the first request.
Choose a single subject and write down its category, shape, viewpoint, style, and most important features. A prompt such as “a compact ceramic teapot with a round body, short spout, lid, and curved handle” gives hitem3d a clearer structure than a broad scene description.
Enter the description in the hitem3d prompt box, or use a clean reference image when the shape is easier to show than explain. Submit one focused request and wait for the model rather than changing several requirements at once.
Review the silhouette, missing parts, scale relationships, and surface quality. If the result is close, make a second request that names only the largest correction, then save the version that best matches your intended use.
Open the delivered hitem3d model in a compatible 3D application for cleanup, materials, rigging, scene setup, or print preparation. Check the mesh before treating it as production-ready.
Keep exploring
These related pages help you choose the right starting point and understand where hitem3d fits in a broader 3D workflow.
Troubleshooting
A generated model is an interpretation, not a guarantee of exact geometry. These limitations are normal, and each has a practical way to reduce wasted iterations.
Requests that combine several objects, a full scene, multiple styles, and detailed actions can produce an unclear result.
Workaround
Generate the main object first, then create supporting pieces separately and assemble them later.
Thin handles, sharp tips, tiny fasteners, and deeply recessed details can be softened, merged, or omitted by the generated mesh.
Workaround
Describe the feature as a major form, increase its visual importance, and inspect it at the intended final size.
Topology, openings, intersections, normals, and watertightness are not guaranteed simply because the model looks correct in a preview.
Workaround
Run the hitem3d output through a 3D editor or mesh repair tool before animation, manufacturing, or final export.
A prompt can suggest proportions, but it should not be treated as a measured engineering specification.
Workaround
Set units and critical measurements manually in your 3D software after generation.
Read the result
Compare the requested idea with the delivered form before spending time on detail work. The first pass is most useful when it answers whether the silhouette and major structure are right.
 Input brief
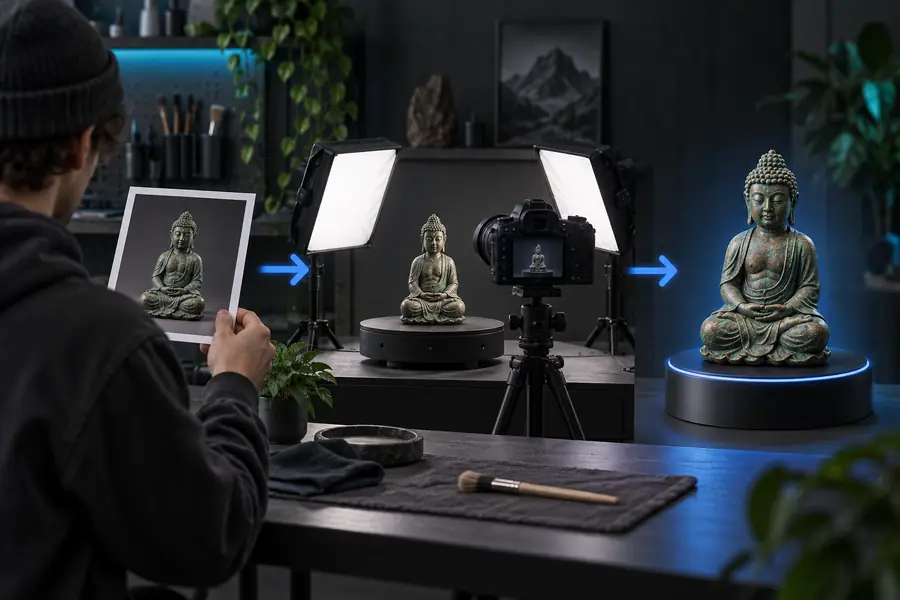 Model output
Choose your input
Use the input type that communicates the important information most directly. This comparison keeps the hitem3d process focused without promising more precision than the source provides.
Best for
Text prompt
Shapes, styles, materials, and visible design intent
Reference image
Objects whose form is easier to show than describe
Preparation
Text prompt
Write one subject with ordered, concrete attributes
Reference image
Use a clear image with the subject easy to separate from its background
Control
Text prompt
Easy to revise one named feature in the next request
Reference image
Useful for preserving broad visual proportions and appearance
Hidden surfaces
Text prompt
Can suggest unseen structure, but the result remains an interpretation
Reference image
Usually provides little information about the back or underside
Fine geometry
Text prompt
Specific details may be simplified if they are too small or complex
Reference image
Visible details can guide appearance but do not guarantee clean topology
After generation
Text prompt
Review the model and add exact dimensions in a 3D editor
Reference image
Repair, measure, and simplify the mesh before downstream use
Best iteration strategy
Text prompt
Change one requirement at a time and compare versions
Reference image
Crop or replace the reference when the subject is ambiguous
Make the next pass count
The strongest hitem3d workflow is iterative: begin with the overall form, identify the most visible problem, and request one targeted correction. Keep the original prompt and each successful version so you can return to a stable direction instead of starting over. When the result is close, move into a 3D editor for dimensions, topology checks, materials, rigging, or print preparation. hitem3d is most valuable as a fast bridge from intention to editable starting point.
Try hitem3d nowQuick answers
Answers to the most common questions people ask when learning how to use hitem3d.
Start with one object and describe its category, shape, style, and defining features. Generate a first result, inspect the silhouette and missing parts, then revise only the most important issue.
Use concrete nouns and visual attributes rather than a long story. Include the subject, proportions, materials, style, and any feature that must be visible, such as “a low-poly robot dog with a compact body and four thick legs.”
If the available workflow accepts a reference image, use a clear image where the subject is easy to identify. A reference can communicate broad form quickly, but you should still inspect hidden surfaces and edit the resulting hitem3d model.
The system interprets the most prominent visual cues, so vague wording, competing requirements, or tiny details can change the result. Simplify the request, emphasize the key shape, and make one correction per iteration.
Not automatically. Check scale, wall thickness, intersections, normals, openings, and watertightness in a suitable 3D or mesh-repair application before printing or using the asset in production.